Web SDK
The Disco Web SDK consists of a few lines of Javascript to automatically report conversions from the frontend of your website.
Direct Integration
-
Add the SDK snippet to your page.
- You should place the below code snippet directly into the HTML on the page that immediately follows your conversion event.
- The Web SDK should be integrated to record all conversions on your site. Disco will then manage attribution by matching users who interacted with your ad to their subsequent conversion.
- Disco will provide you with a Publisher ID that will be passed into the Javascript source path to ensure appropriate information is loaded.
<!DOCTYPE html>
<html lang="en">
  <head>
    <!-- Meta tags -->

    <!-- Part #1: Load the Disco Web SDK -->
    <script
      src="https://d1zcmvsklxjbur.cloudfront.net/static/disco-sdk.js"
      type="text/javascript"
      publisher_id="PUBLISHER_ID"
    ></script>

    <!-- Other scripts and meta tags -->
  </head>
</html> -
Populate and pass relevant data attributes.
- As soon as the data is available on your confirmation page, execute the below JavaScript to relay conversion data to Disco.
- There are two required data fields: a customer identifier and the event name.
- One of raw email, SHA256 email hash, or the URL-appended click identifier is required as a customer identifier to attribute conversions.
- If you are using the click identifier, this will be passed to you as a URL parameter in your landing page URL. You must extract the parameter from the URL and pass back the same identifier in the payload.
- The event name should be a hardcoded “SIGNUP”.
- The rest of the fields are optional, contextual information that may improve your performance.
<script>
  window.discoLauncher.trackEvent({
    event_name: "SIGNUP", // required
    event_properties: {
      // one of the two email identifiers is required
      email: String,
      email_hash: String, // SHA256 hashing
      click_id: String,

      // all of the below fields are optional
      phone: String,
      first_name: String,
      last_name: String,
      shipping: {
        address_line_1: String,
        address_line_2: String,
        city: String,
        state: String,
        zip: String,
      },
      billing: {
        address_line_1: String,
        address_line_2: String,
        city: String,
        state: String,
        zip: String,
      },
      confirmation_id: String,
      purchases: [
        {
          product_id: String,
          type: String,
          name: String,
          description: String,
          variant: String,
          quantity: String,
        },
      ],
      cost: String,
      order_id: String,
      page_type: String,
    },
  });
</script>
Google Tag Manager
You can also implement the Disco Web SDK via Google Tag Manager. However, you should utilize the direct integration above for best results.
The Data Layer
The data layer is an object used to make data readily available to Google Tag Manager (GTM). Events or variables can be passed via the data layer, and triggers can be set up based on the values of variables. If you are already using GTM, your development team should have already built the data layer. See here for more documentation.
If you already have a raw email or SHA256 email hash pushed to the data layer, then you can re-use that variable for the Disco integration. If not, you will need to push a new variable and create the user-defined variable in GTM.
Your developer will need add the following code to your confirmation page:
window.dataLayer.push({
  email: "aaron.smith@disconetwork.com",
});
Then you will use Google Tag Manager to access the new data variable.
- Open Google Tag Manager.
- Click Variables.
- Navigate to User-Defined Variables and click New.
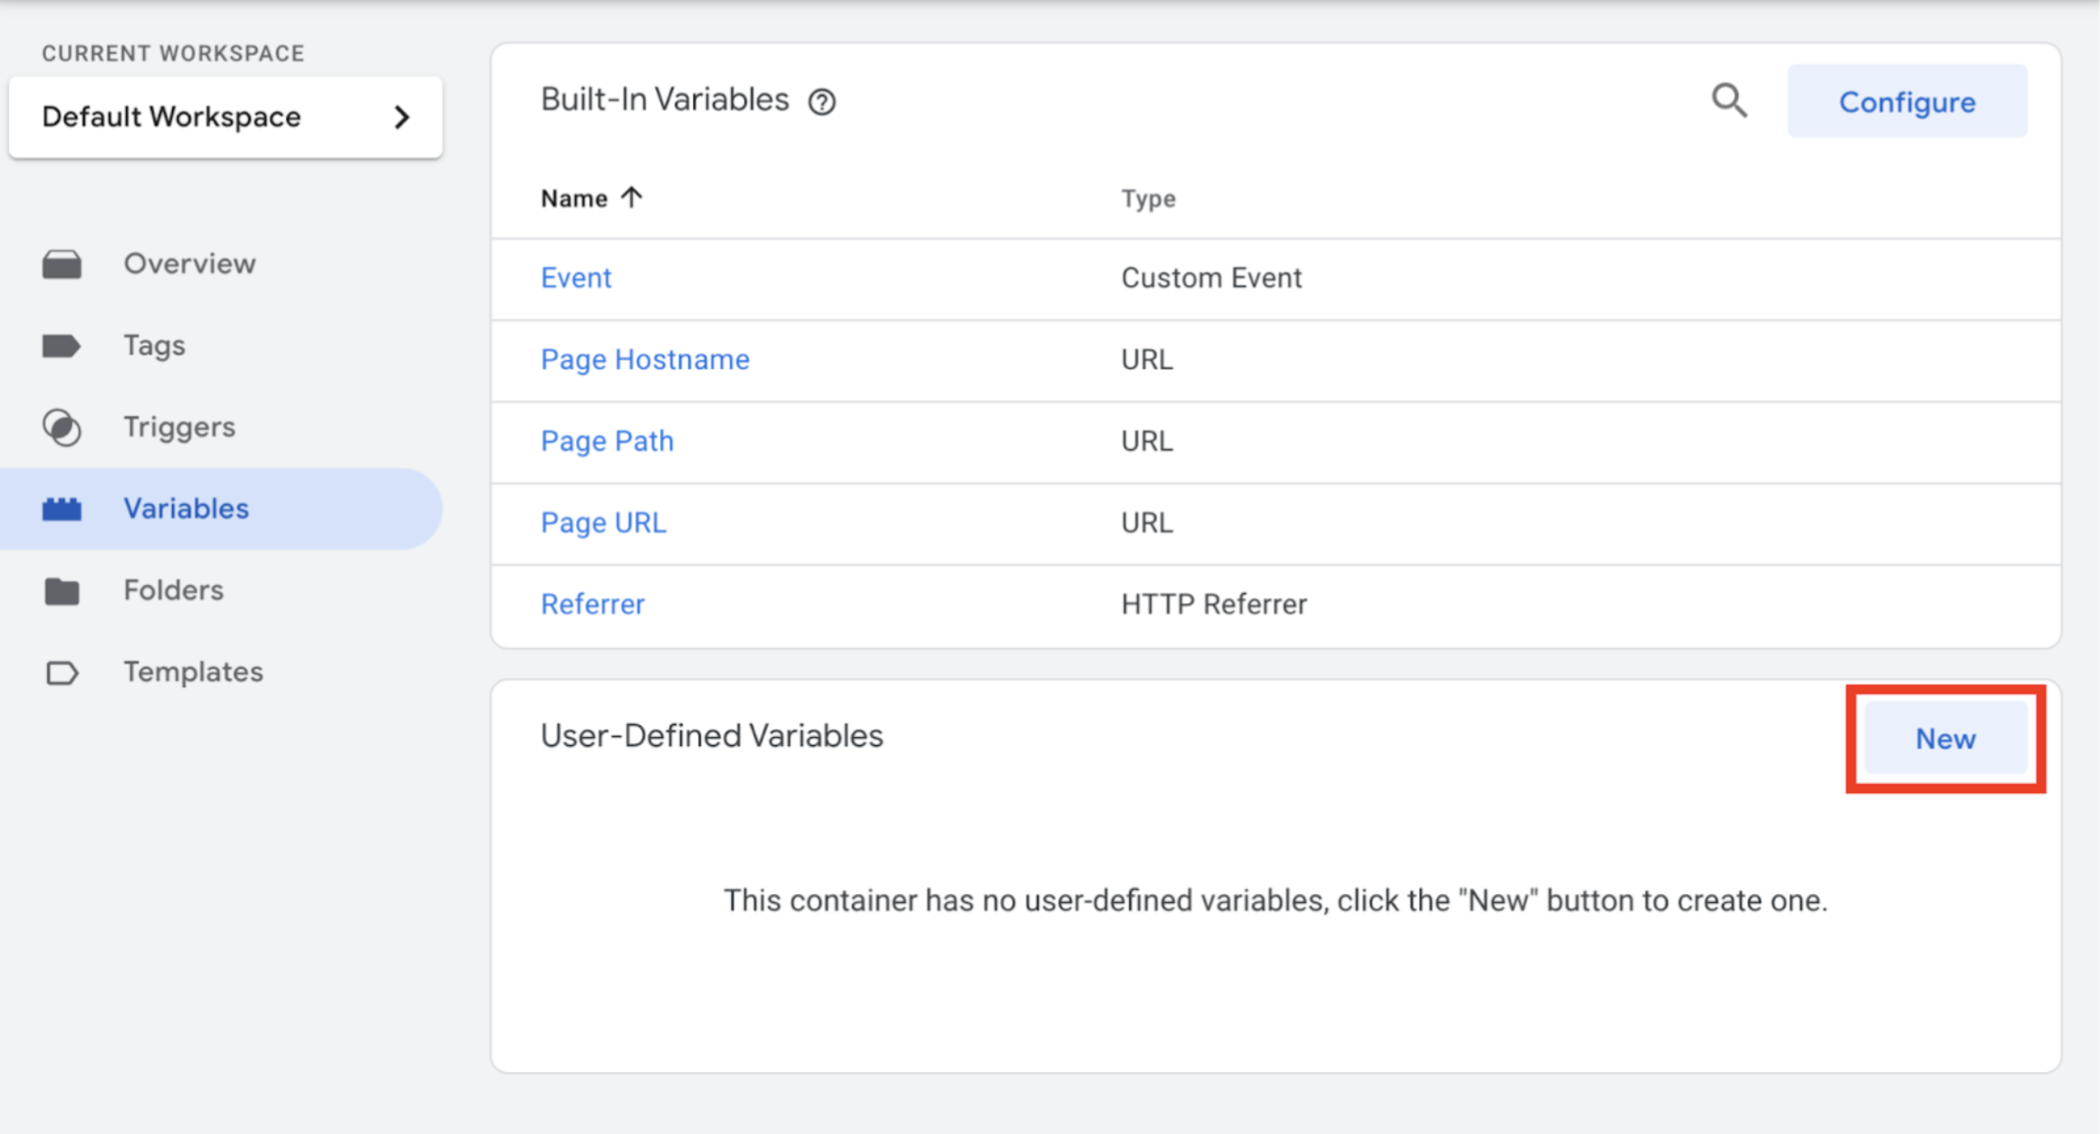
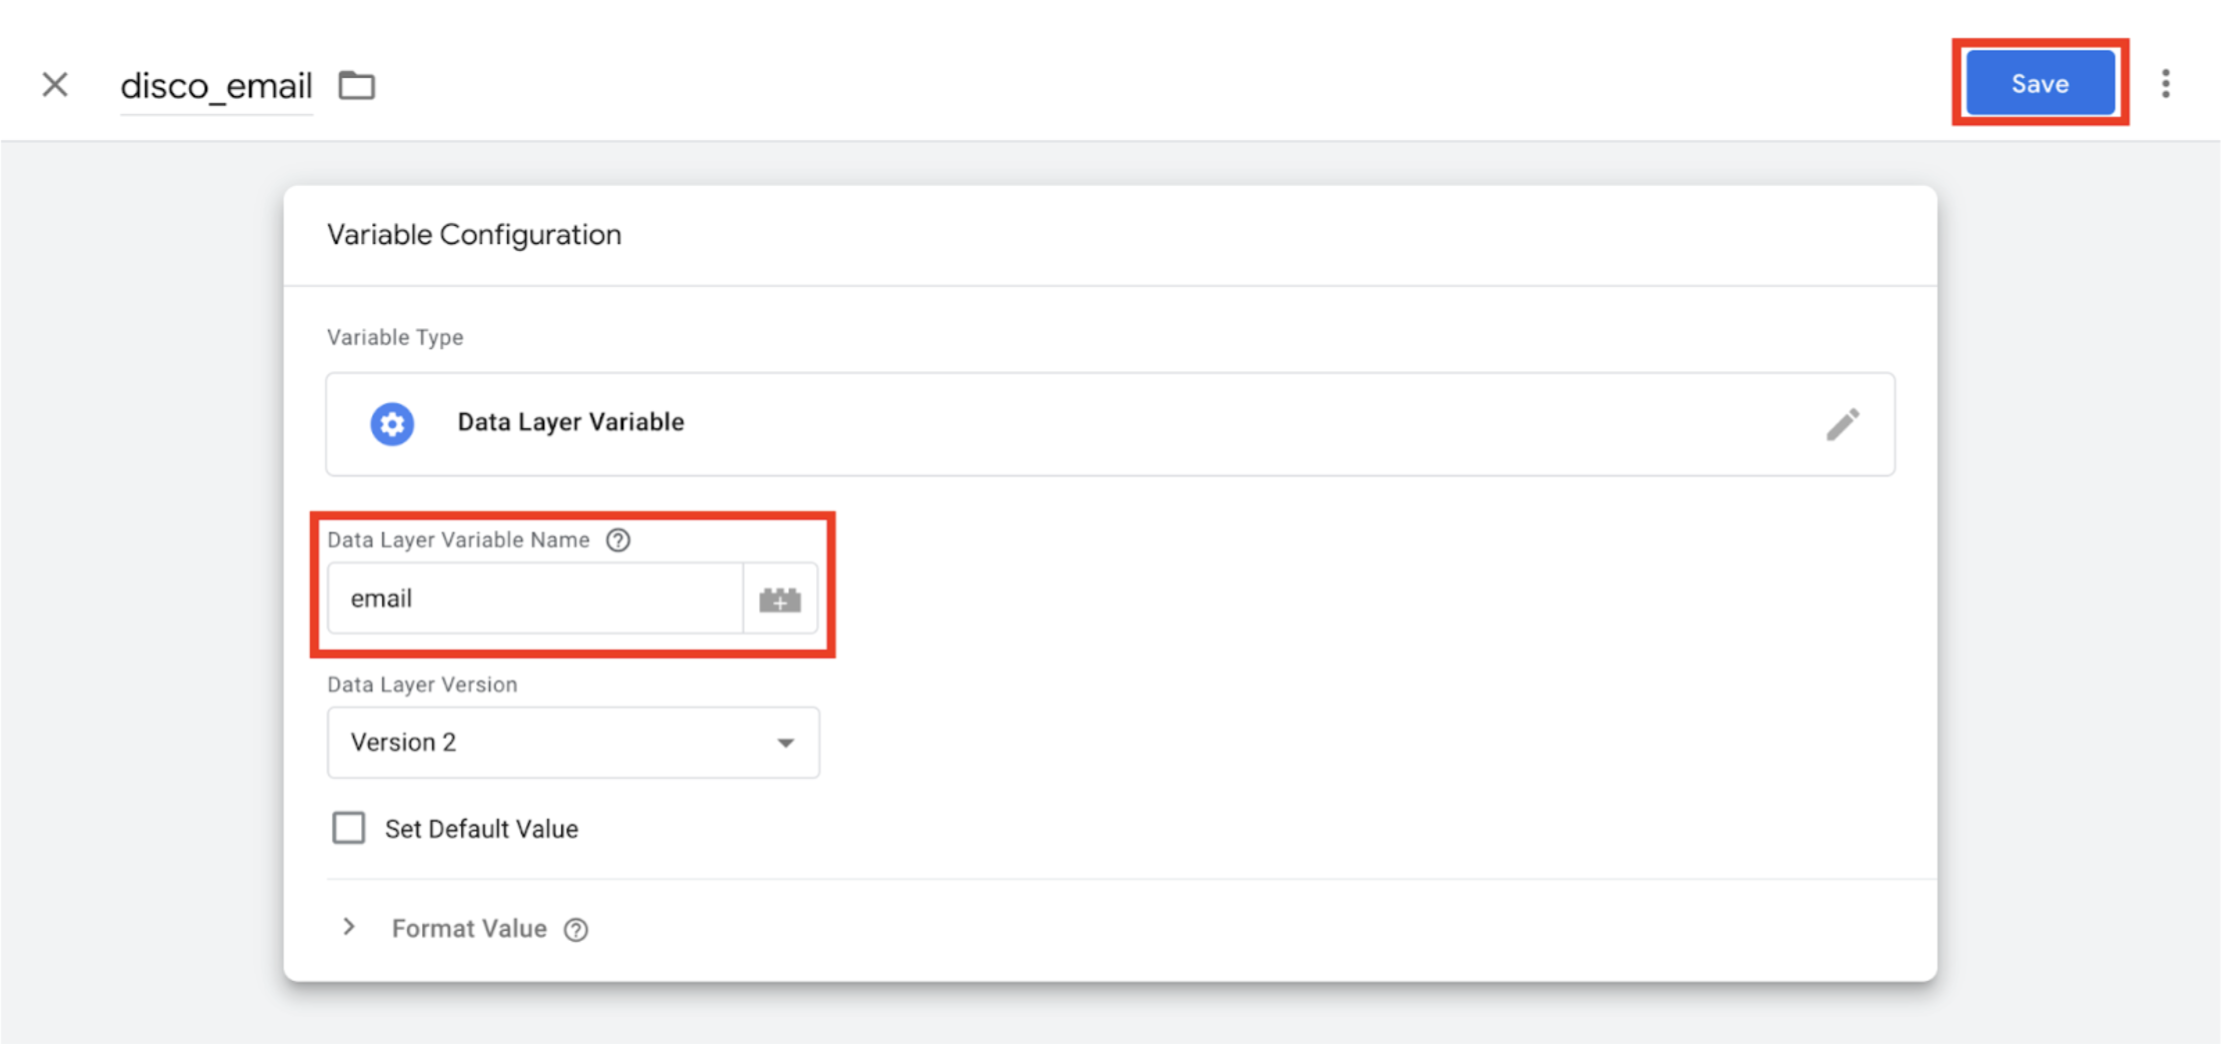
- Name your variable (e.g. disco_email).
- Set the variable type as Data Layer Variable.
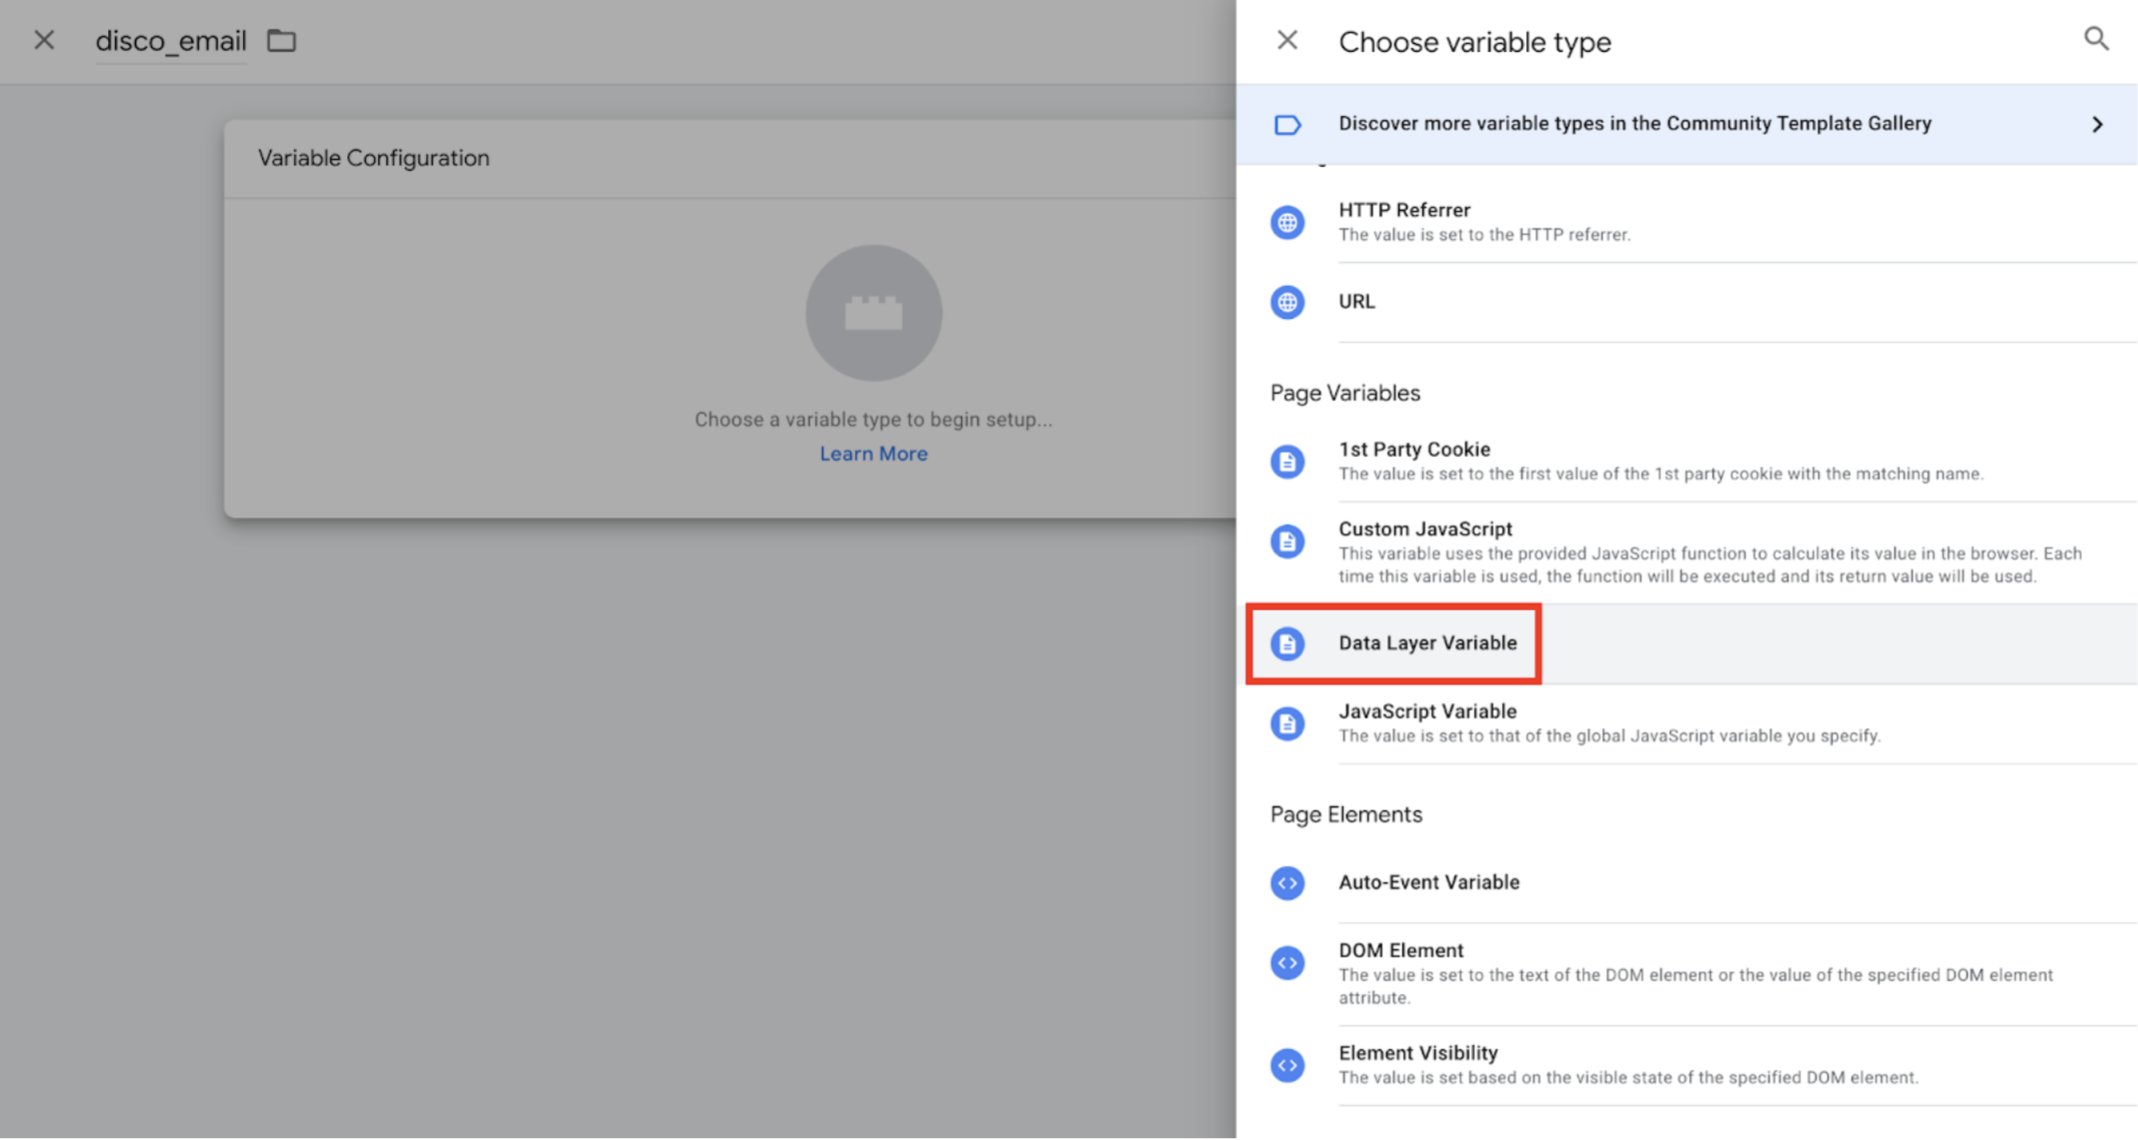
- Enter the data layer variable name with the name of the key you used to push the variable.
- Click Save.
Custom HTML Tag Setup
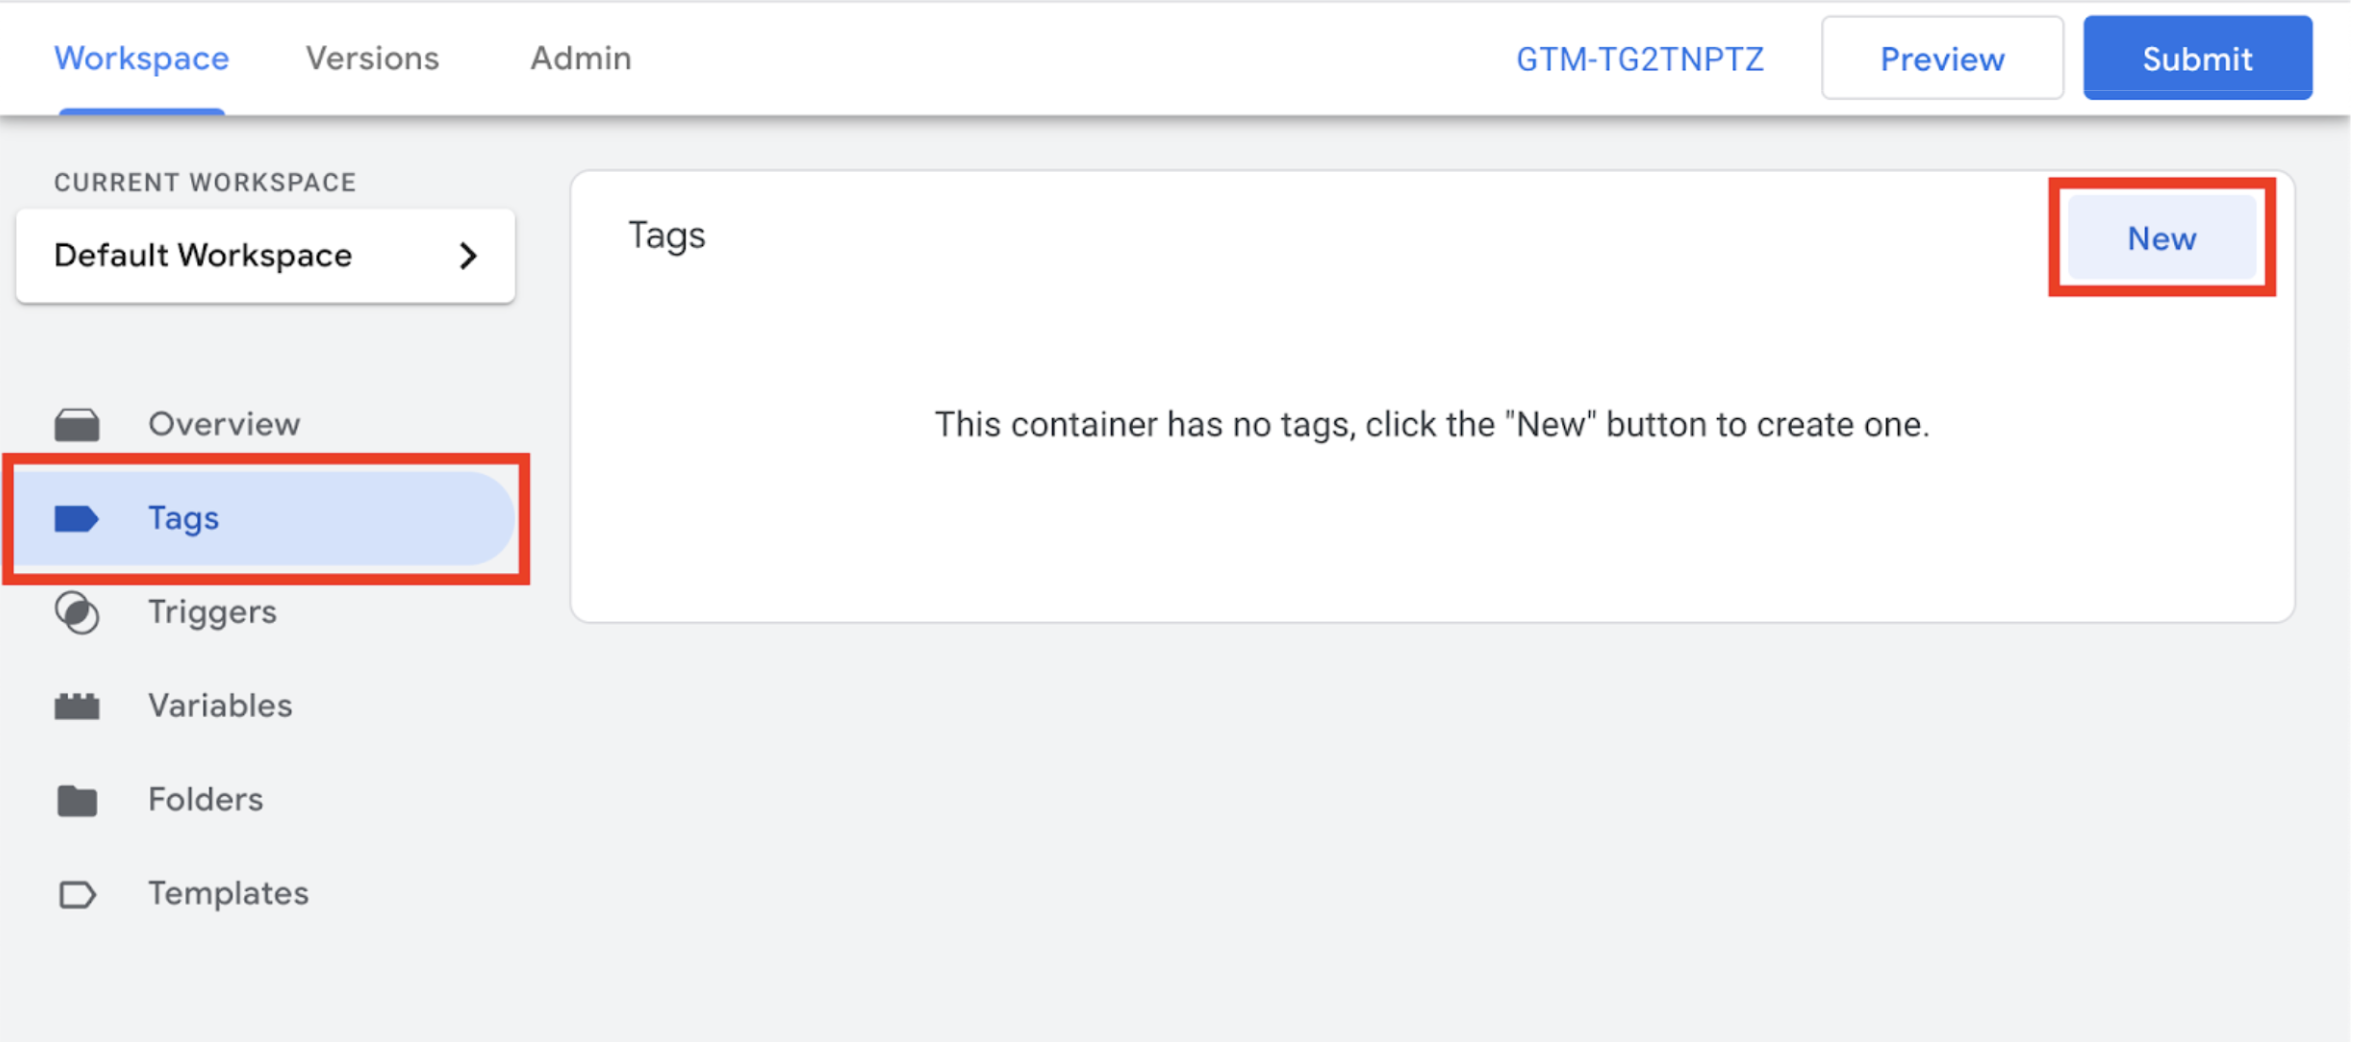
- Open Google Tag Manager.
- Navigate to your account.
- Click Tags.
- Click New.
- Name your tag (ex: Disco Tag).
- Click Tag Configuration.
- Select Custom HTML.
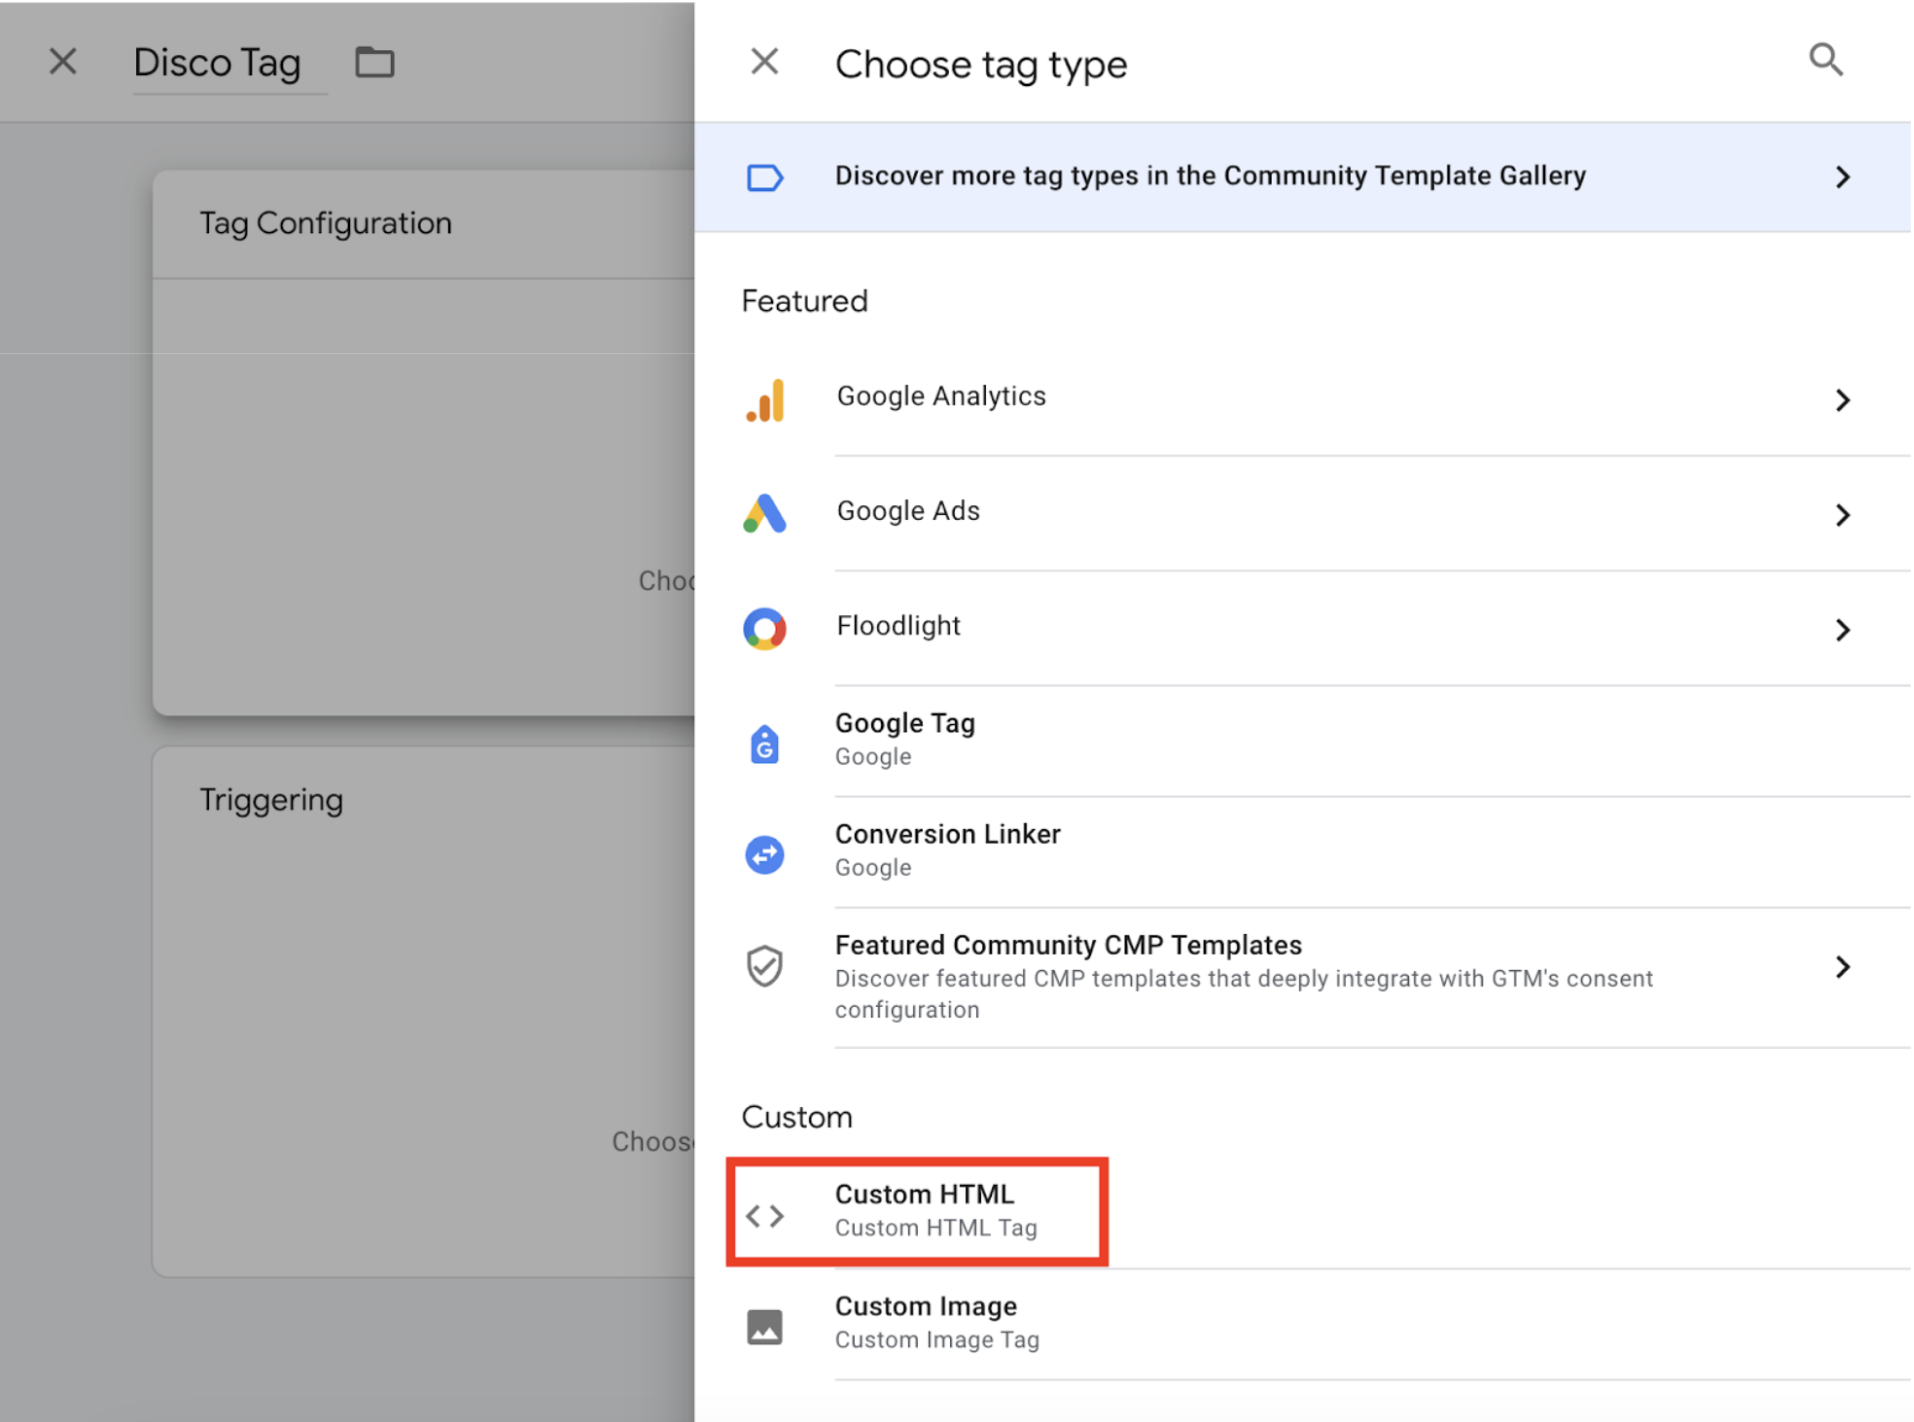
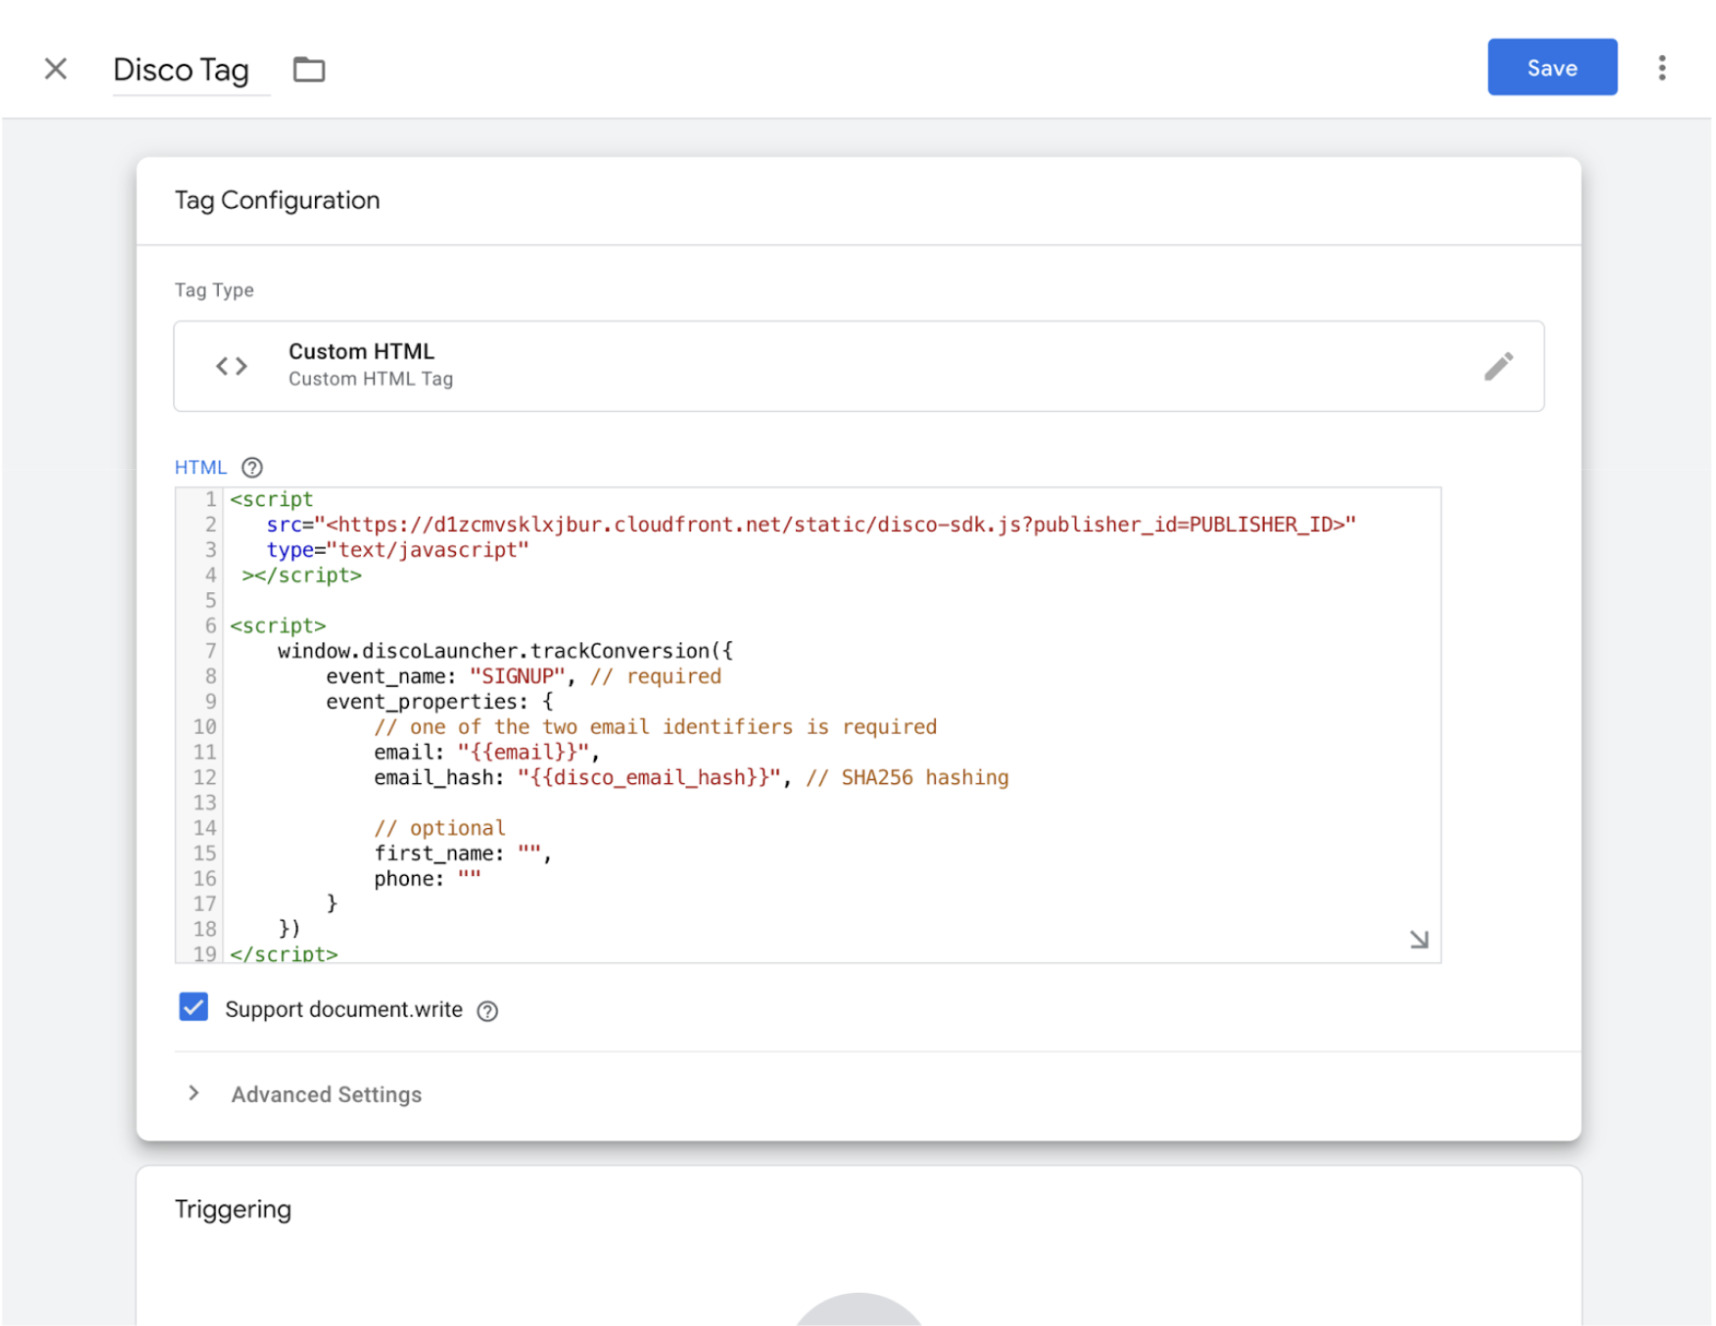
- Enter the HTML script tags.
- You will implement very similar code to the direct integration. The only change will be adding your publisher_id as a URL parameter.
- For the dynamic user-defined variables (e.g. email or email hash), you will replace the values with
{{variable_name}}. - Be sure to select Support document.write.
<script
  src="https://d1zcmvsklxjbur.cloudfront.net/static/disco-sdk.js?publisher_id=PUBLISHER_ID"
  type="text/javascript"
></script>
Trigger
If you are already using GTM, you most likely have a trigger already implemented for when to fire conversion tags. If not, you will need to add a new trigger in order for GTM to fire the Disco conversion tag. GTM tags require a trigger to fire.
For some advertisers, this may be when a confirmation page loads. To implement this type of page-based trigger:
If you are using a Single-page Application:
- Click Triggering from the same Tag setup screen.
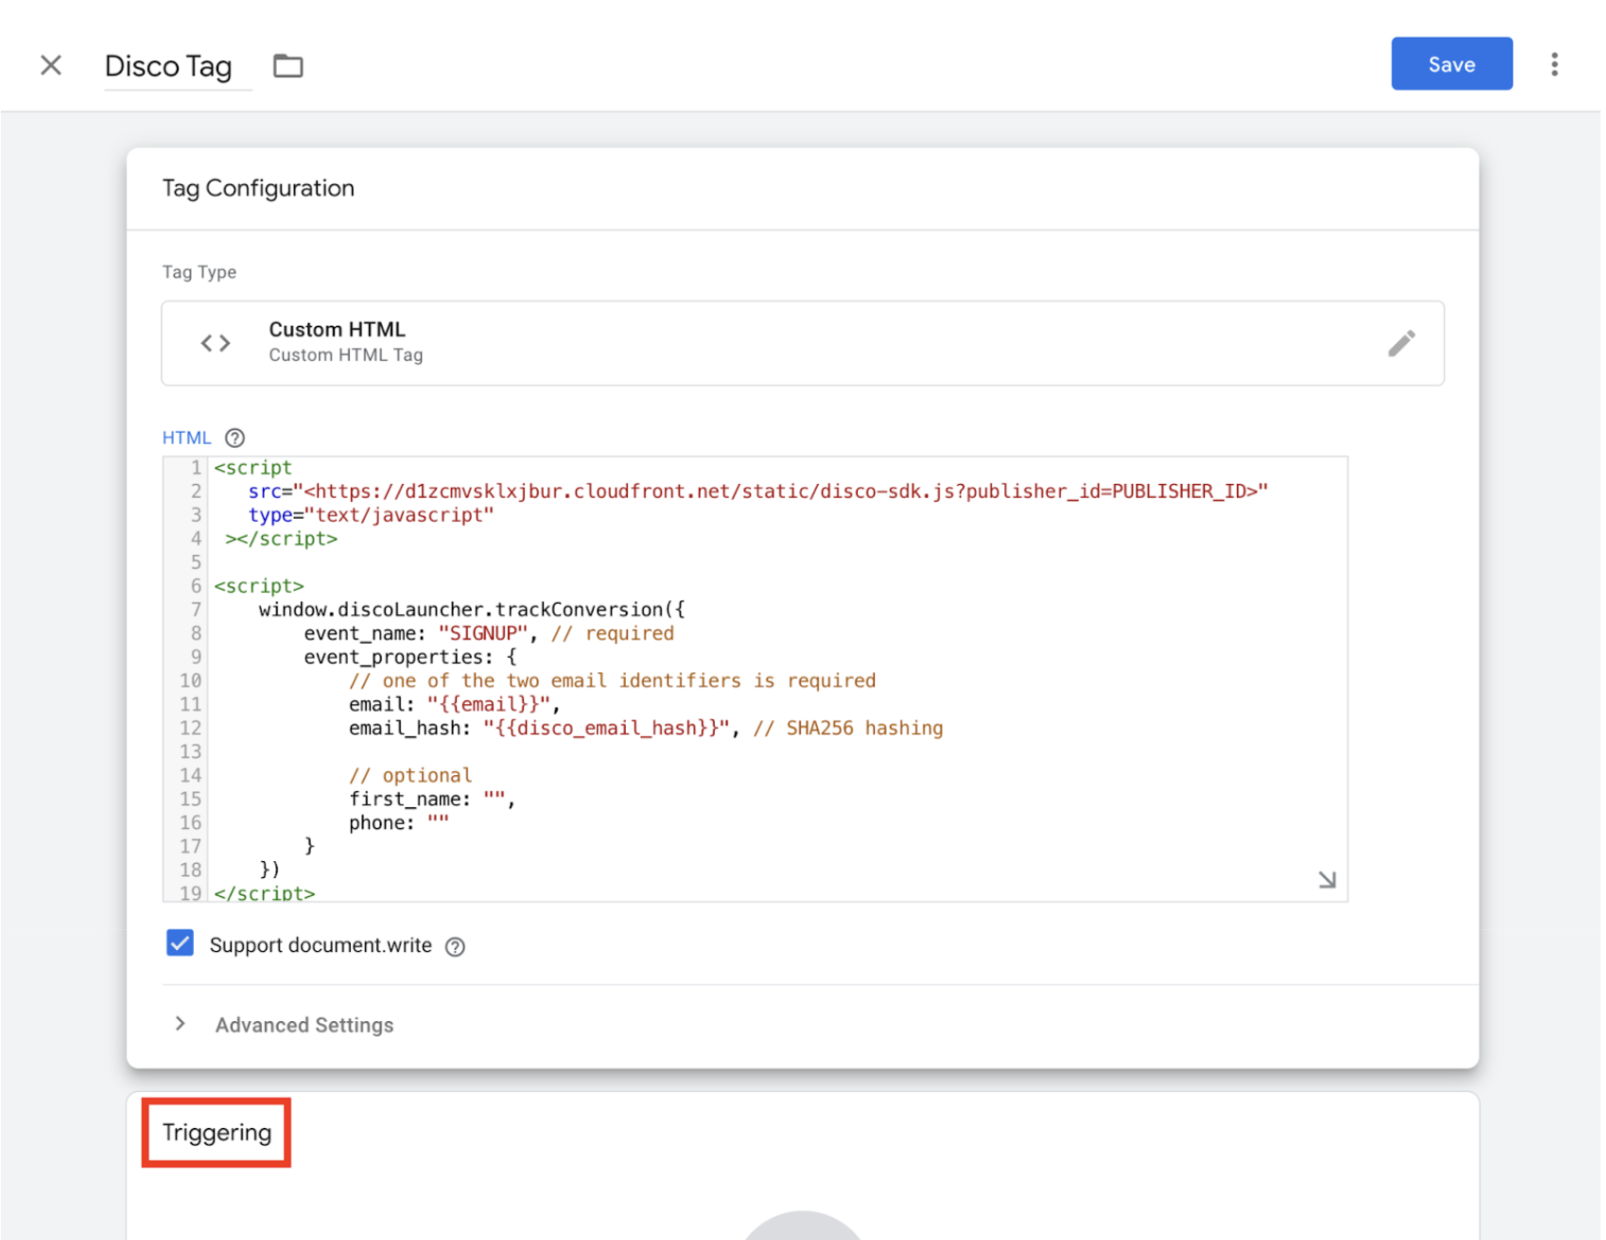
- Click the plus (+) sign in the top right corner.
- Name your trigger (e.g. Confirmation Page Load).
- Click Trigger Configuration.
- Select History Change.
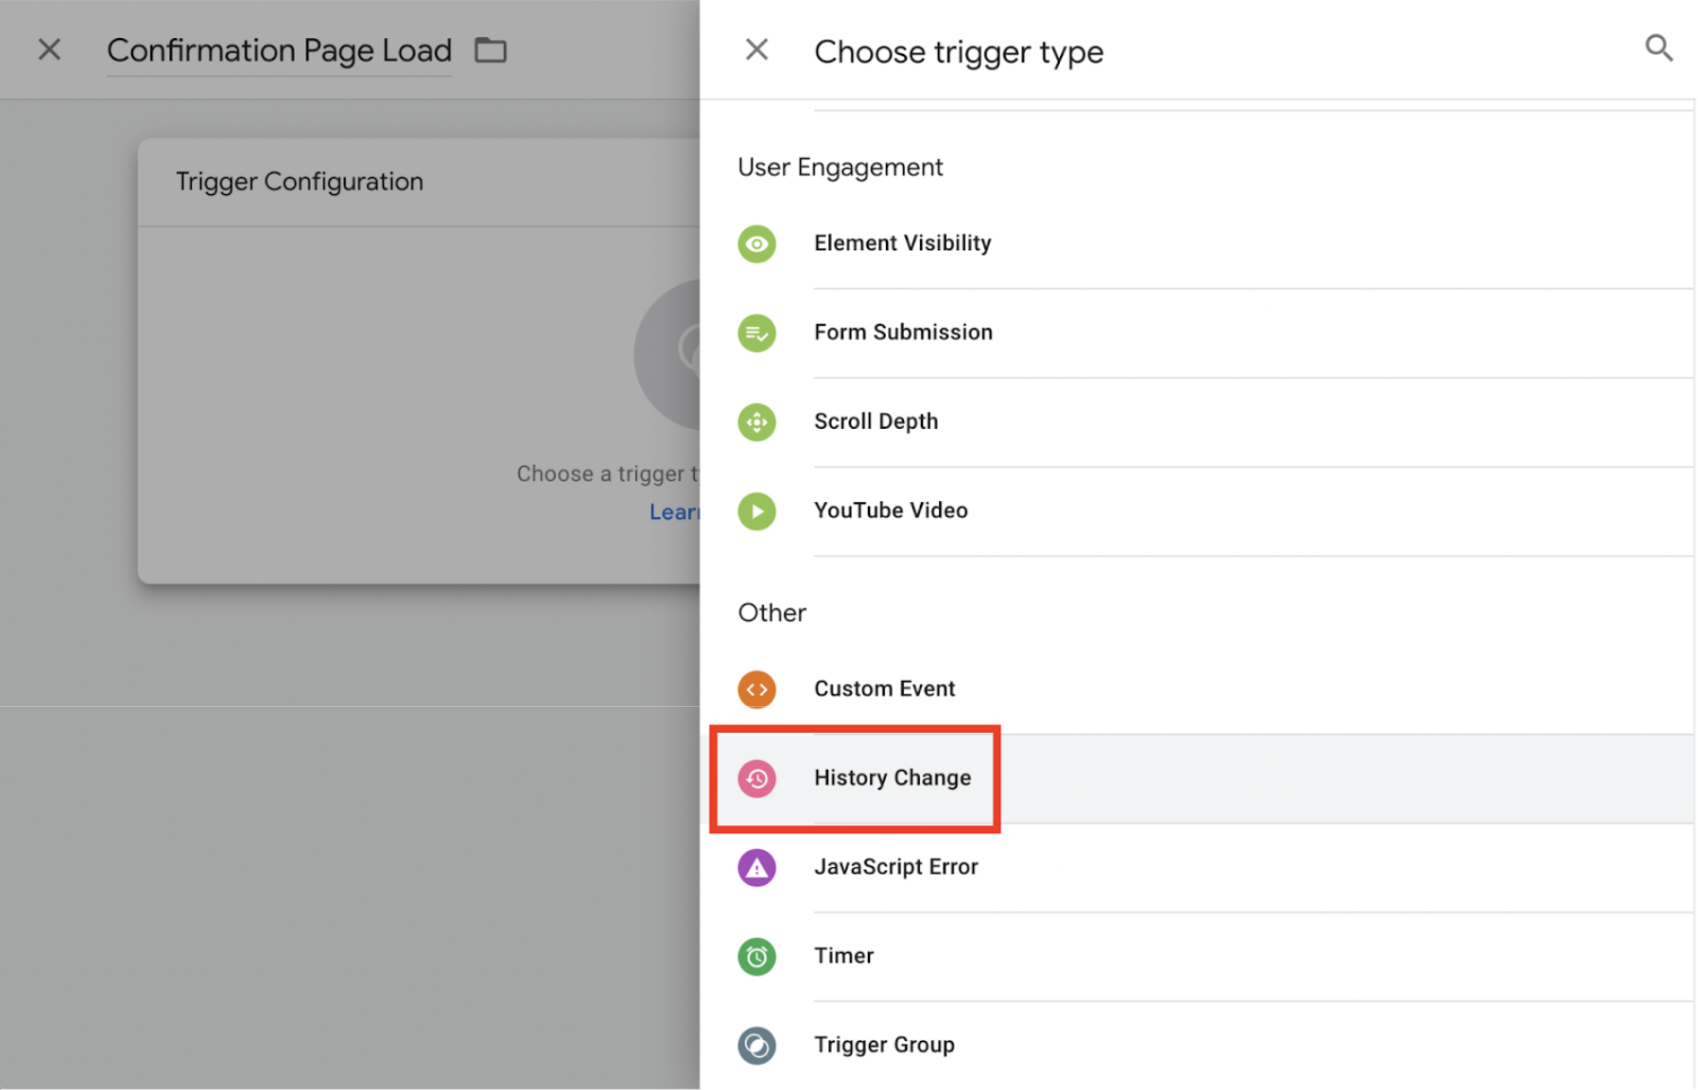
- Change the firing rules to Some History Changes.
- Enter the URL condition to identify the pages that trigger your conversion.
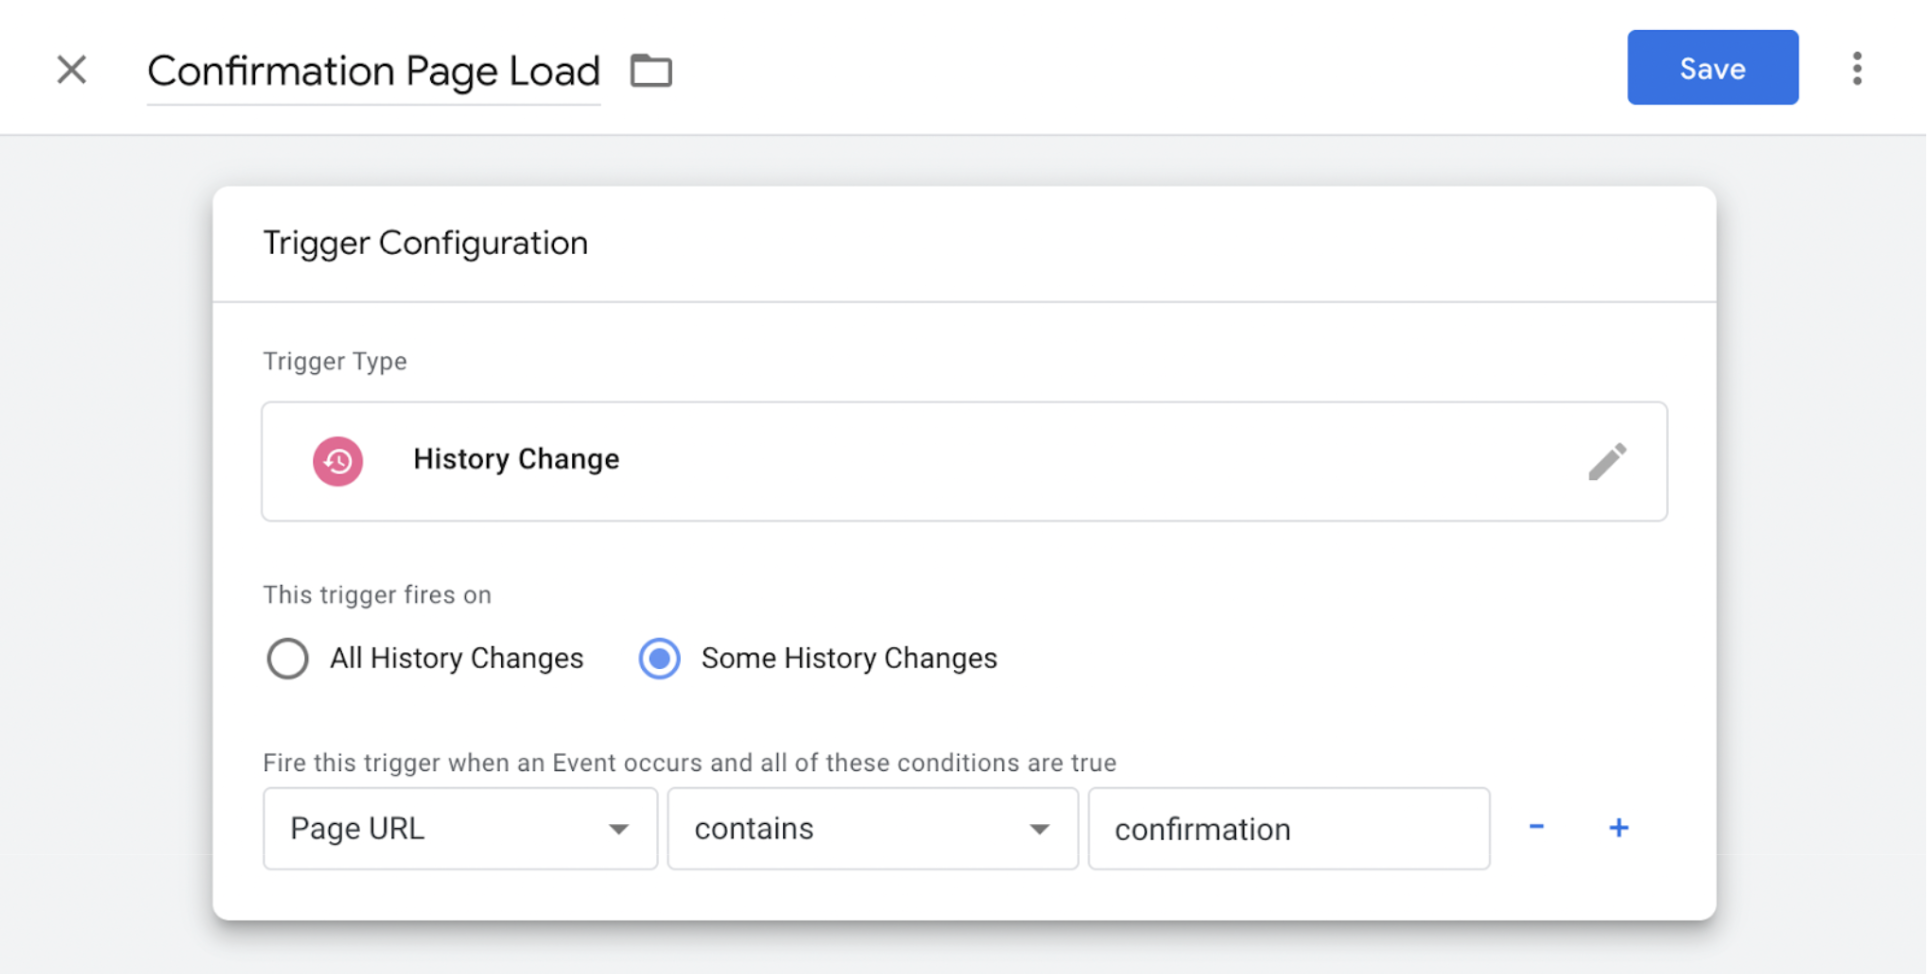
- Click Save.
If you are using a Multi-page Application:
- Click Triggering from the same Tag setup screen.
- Click the plus (+) sign in the top right corner.
- Name your trigger (e.g. Confirmation Page Load).
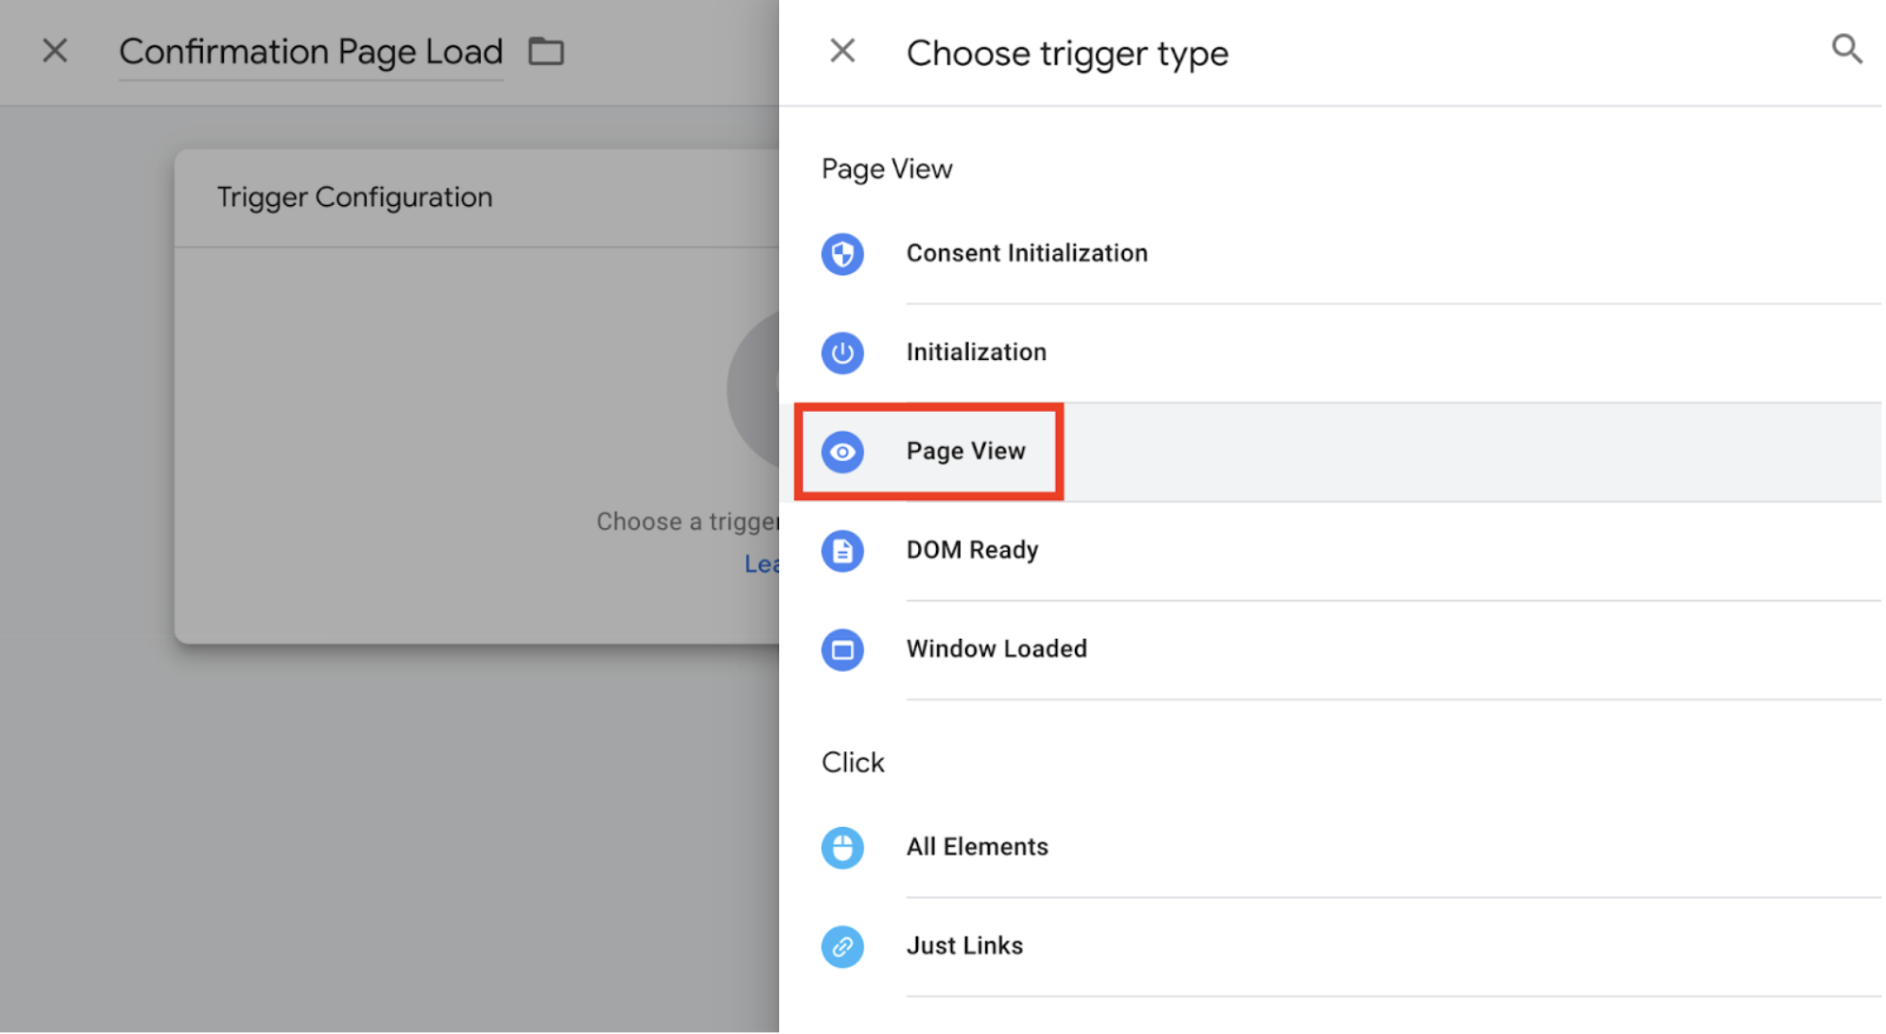
- Click Trigger Configuration.
- Select Page View.
- Change the firing rules to Some Page Views.
- Enter the URL condition to identify the pages that trigger your conversion.
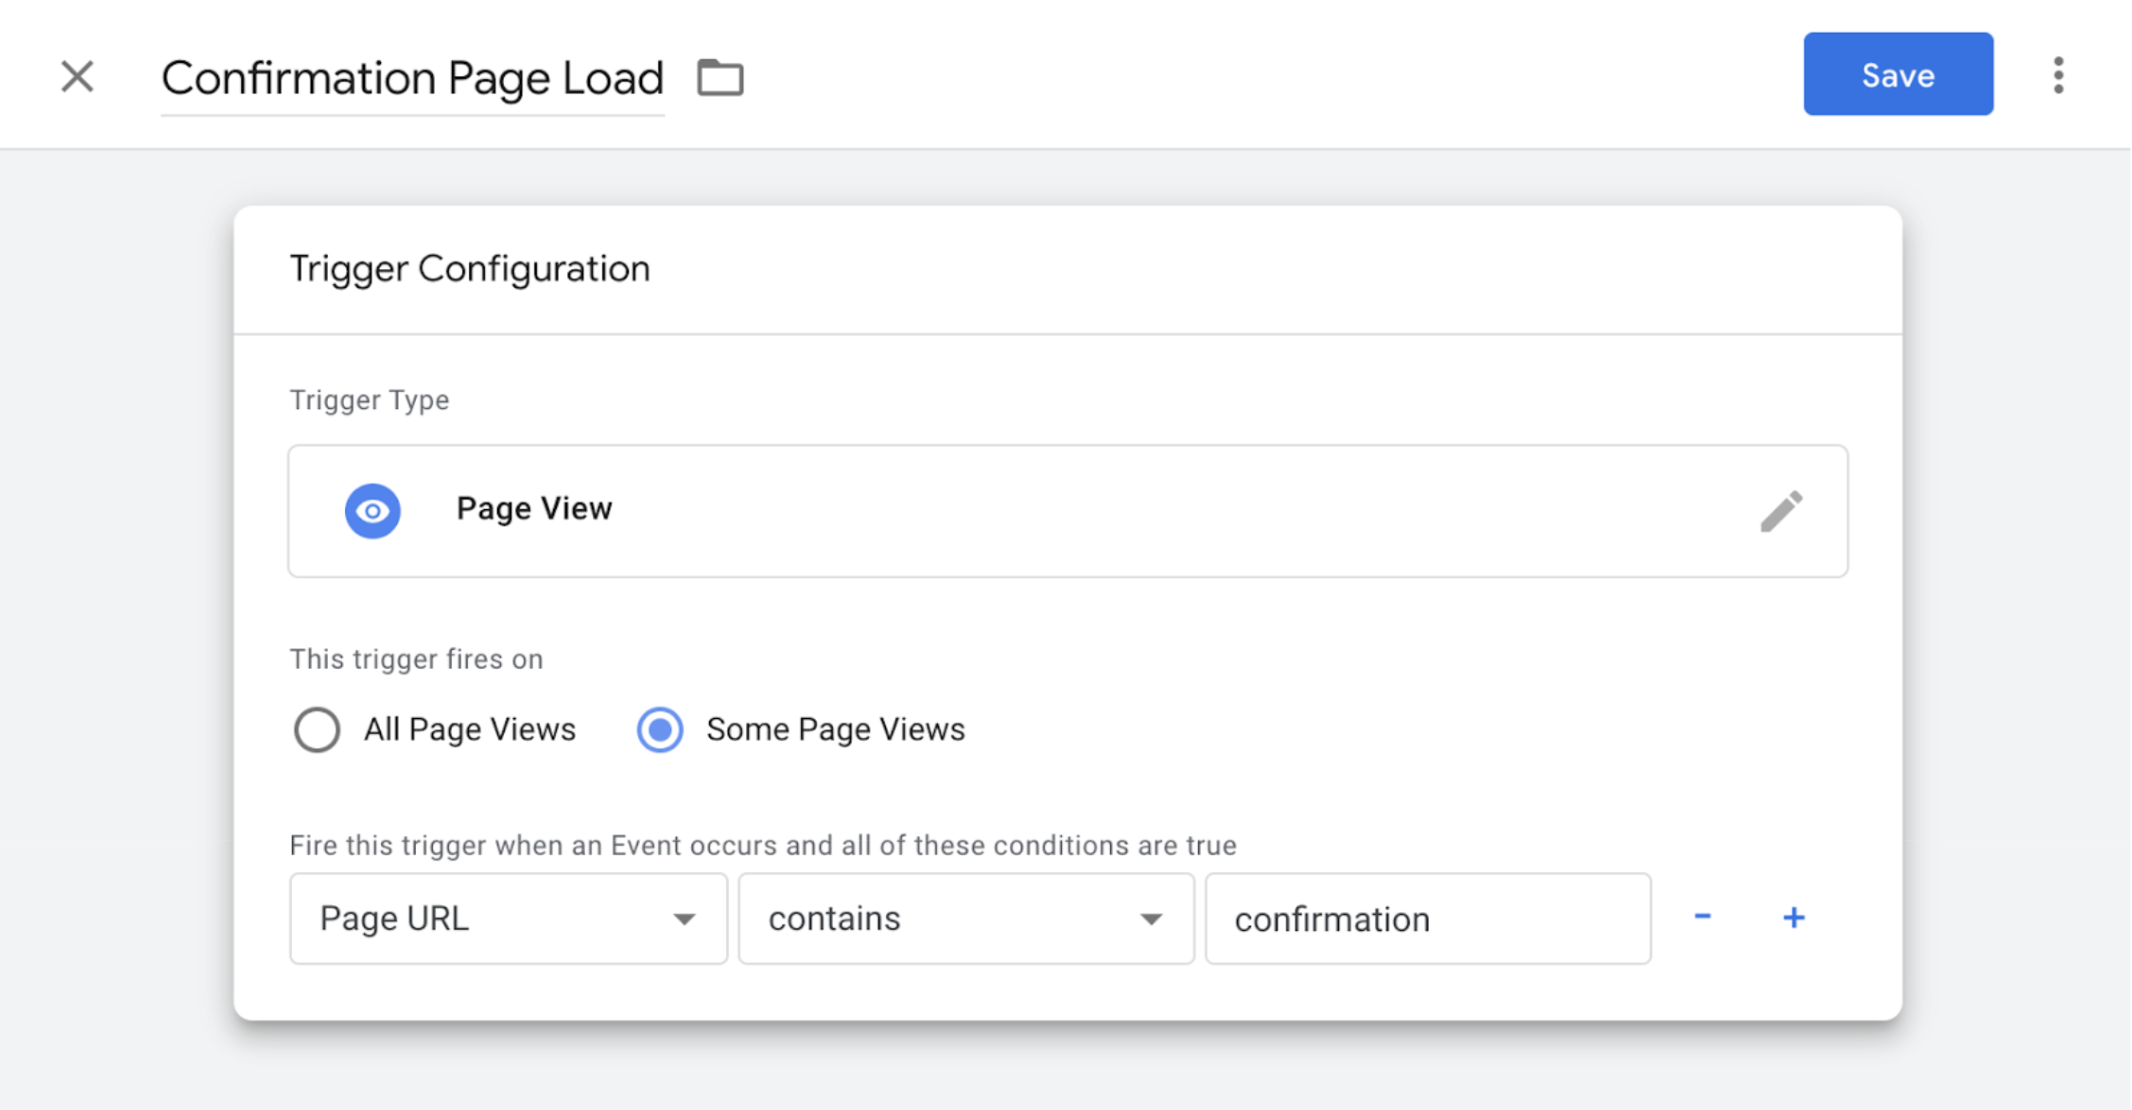
- Click Save.